A Newspaper
This example illustrates how to use FlowframTk to create a class or package based on the flowfram package, using non-standard shaped frames. The aim is to produce the document shown in Figure 11.79.
- In this example, my newspaper is going to be on A4 portrait
paper, with a normal font size of 12pt, so the first
thing to do is to select the paper size and orientation using
Settings->Paper->A4 and
Settings->Paper->Portrait, and set the value of the
LaTeX normal size font, using
the Settings->Configure TeX/LaTeX Settings dialog box
(see Figure 11.49). Select 12 from the
drop-down list.

Figure 11.49: Newspaper Example--Setting the LaTeX Normal Font Size - The 12pt font size has a corresponding \baselineskip
of 14.5pt. For this example, it is more practical to have a grid
that has intervals of this size, as it gives a guide as to how many
lines there will be in each frame.11.1 Therefore I set the grid to have 145pt major divisions with
10 subdivisions. This means that each minor tick mark is at a distance
of 14.5pt (one \baselineskip) from its neighbour. To do this
select Settings->Grid->Grid Settings, and enter the
values as shown in Figure 11.50.

Figure 11.50: Newspaper Example--Setting the Grid - To help reduce rounding errors, I'm also going to set the
storage unit to 1pt. To do this select
Settings->Configure Image Settings and change the storage unit in the
Control Points tab, as shown in
Figure 11.51.
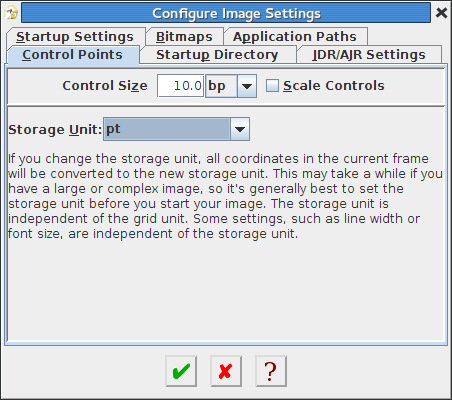
Figure 11.51: Newspaper Example--Setting the Storage Unit - Next set the typeblock. This nominally defines the paper
margins, although it is possible to define frames outside this
area. I used 58pt margins on all sides. To do this, select
TeX/LaTeX->Flow Frames->Set Typeblock which will display
the dialog box shown in Figure 11.52. Enter the values
shown and click on Okay or press Enter
to continue. You should now see a pale grey rectangle displayed
on the canvas denoting the typeblock.

Figure 11.52: Newspaper Example--Setting the Typeblock - The newspaper is going to have a static frame along the
top of the typeblock that will contain the title of the paper. This
isn't going to have a border, but we will need to draw a rectangle
to define the frame's bounding box. So select the
rectangle tool and draw a
rectangle with opposing corners at (58pt,58pt) and
(536.5pt,145pt). You should now see something like
Figure 11.53.
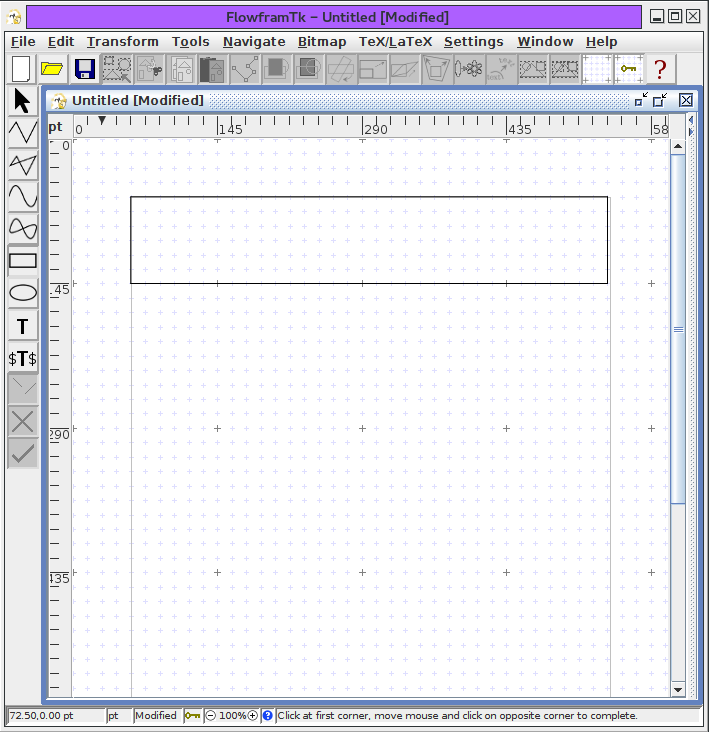
Figure 11.53: Newspaper Example--Title Frame - Switch to the select tool, and
select this rectangle. Select
TeX/LaTeX->Flow Frames->Set Frame and enter the values
shown in Figure 11.54(a). Note that the
Border field has been set to
None.
The frame contents should be:
\begin{center}
\bfseries\Huge
Fairy Tale Times
\end{center}
\hfill Issue 2. 7 December 2005.
This can be set by clicking on the Edit button, which will open the mini TeX editor, shown in Figure 11.54(b).
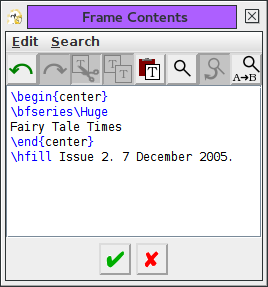
(a) (b) Figure 11.54: Newspaper Example--Assigning Flowframe Data to Title Frame: (a) frame setup; (b) setting the frame contents - Below the title, there will be two columns each with its
own heading. I am going to make separate frames for the headings,
and since the headings will be in a larger font, I shall give their
frames a height of twice the \baselineskip. Select the
rectangle tool, and make two
rectangles with opposing corners at:
- (58pt, 159.5pt) and (290pt, 188.5pt)
- (304.5pt, 159.5pt) and (536.5pt, 188.5pt)

Figure 11.55: Newspaper Example--Left and Right Heading Frames Added - Switch to the select tool, and
select the left hand frame, and assign the flowframe data shown in
Figure 11.56. The frame contents contains the section
command:
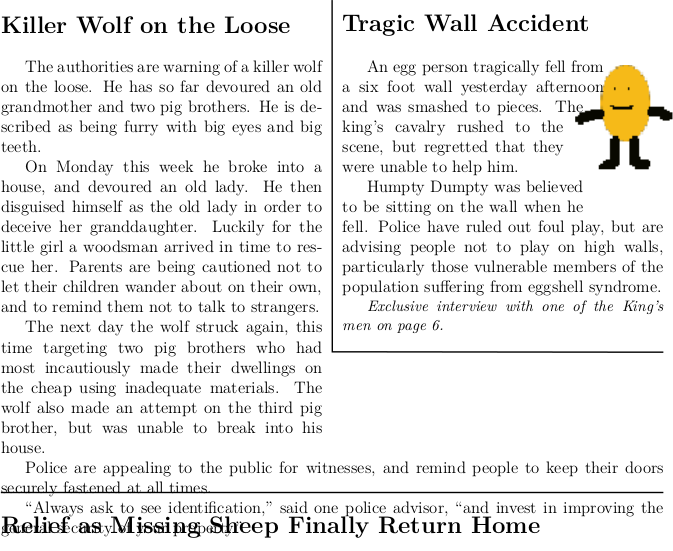
\section{Killer Wolf on the Loose}This is again set using the Edit button to open the TeX editor.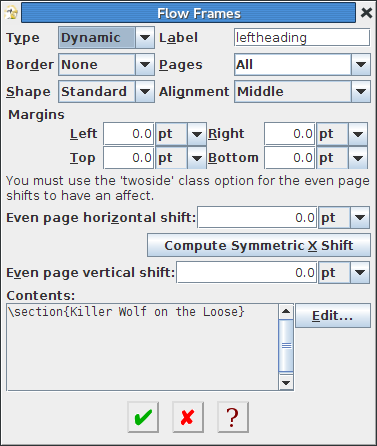
Figure 11.56: Newspaper Example--Assigning Flowframe Data to Left Heading Frame - Do the same for the right hand rectangle, but
call it rightheading. The frame contents contains the
section command:
\section{Tragic Wall Accident} - The left hand column is going to angle around underneath the
right hand column, as it will have more text in it. Select the
closed line tool and make a
polygon with vertices at (58pt, 203pt), (58pt, 507.5pt), (536.5pt,
507.5pt), (536.5pt, 420.5pt), (290pt, 420.5pt) and (290pt, 203pt) as
shown in Figure 11.57.
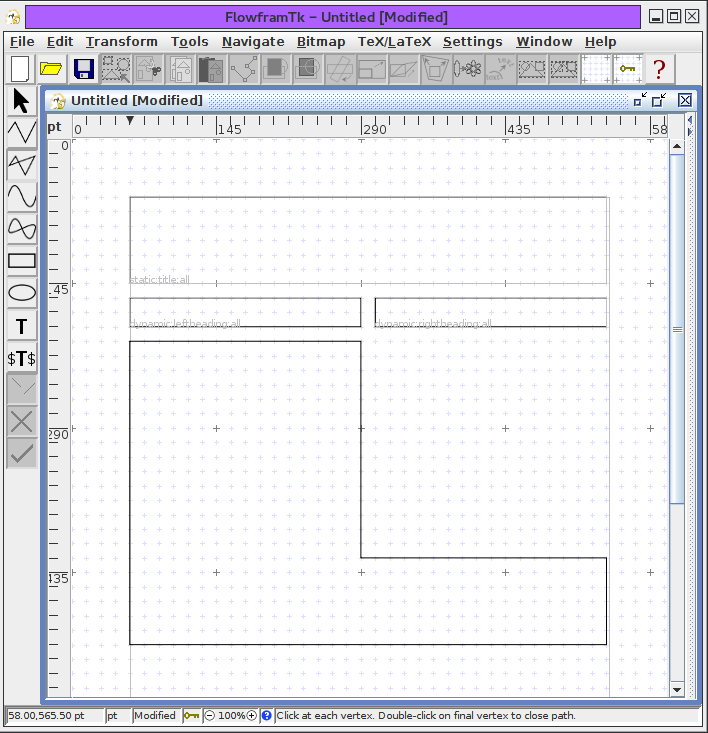
Figure 11.57: Newspaper Example--Added L Shaped Frame - Switch to the select tool, and
select this L shaped polygon, and assigned the flowframe data
shown in Figure 11.58. Note that the
Alignment field has been set to
Top to ensure that if there is
insufficient text to fill the frame, all blank space will go at the
bottom of the frame, and thus help to keep the frame's shape. I
used Parshape rather than
Shapepar to define the frame's shape
as I don't want it to shrink and grow to fit the text.
The frame contents are quite long. You can either set the text in FlowframTk or use one of flowfram's commands in the document. Here's the full text:
The authorities are warning of a killer wolf on the
loose. He has so far devoured an old grandmother and
two pig brothers. He is described as being furry with
big eyes and big teeth.

On Monday this week he broke into a house, and devoured
an old lady. He then disguised himself as the old lady
in order to deceive her granddaughter. Luckily for the little
girl a woodsman arrived in time to rescue her. Parents are
being cautioned not to let their children wander about on
their own, and to remind them not to talk to strangers.

The next day the wolf struck again, this time targeting two
pig brothers who had most incautiously made their dwellings
on the cheap using inadequate materials. The wolf also made
an attempt on the third pig brother, but was unable to break
into his house.

Police are appealing to the public for witnesses, and remind
people to keep their doors securely fastened at all times.

``Always ask to see identification,'' said one police advisor,
``and invest in improving the general security of your property.''
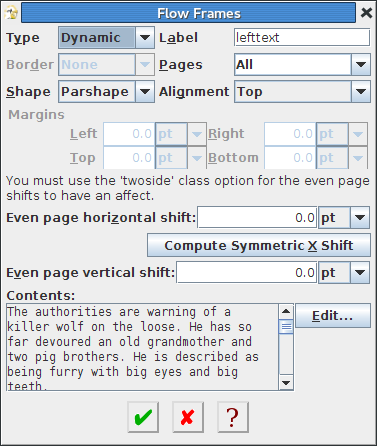
Figure 11.58: Newspaper Example--Assigning Flowframe Data to L Shaped Frame - I'm going to illustrate the story in the right hand column.
The image egg.png is supplied with the flowfram
package but is also available in the examples subdirectory of
FlowframTk's installation directory. Use Bitmap->Insert Bitmap
to insert the bitmap on the canvas. This will initially
appear in the top left hand corner of the canvas. Move it
over to the location shown in Figure 11.59, either by
dragging it or by using Edit->Move By and specifying
a horizontal (x) displacement of 472.8pt
and a vertical (y) displacement of 206pt.

Figure 11.59: Newspaper Example--Added Image - Set the flowframe data shown in Figure 11.60 to
this bitmap. Note that you must set the
Border setting to
As Shown, otherwise the bitmap
will not appear in the document.

Figure 11.60: Newspaper Example--Assigning Flowframe Data to Bitmap - Next comes the right hand frame. This is a polygon with a
stepped area that goes around the bitmap. Select the
closed line tool, and construct a
polygon with vertices at:
(304.5pt, 203pt), (304.5pt, 406pt), (536.5pt, 406pt),
(536.5pt, 290pt), (478.5pt, 290pt), (478.5pt, 261pt),
(464pt, 261pt), (464pt, 232pt), (478.5pt, 232pt)
(478.5pt, 217.5pt), (493pt, 217.5pt) and (493pt, 203pt) as shown in
Figure 11.61.

Figure 11.61: Newspaper Example--Added Right Hand Polygon - Switch to the select tool, select
this polygon and assign the flowframe data shown in
Figure 11.62. Note that the
Shape field has been set to
Parshape and the
Alignment field has been set to
Top. Again, the contents of the
frame are quite long and can either be set using FlowframTk or
using on of flowfram's commands in the document. I'm going to set
the contents using FlowframTk, as above. The text is as follows:
An egg person tragically fell from a six foot wall
yesterday afternoon and was smashed to pieces. The
king's cavalry rushed to the scene, but regretted
that they were unable to help him.

Humpty Dumpty was believed to be sitting on the wall
when he fell.  Police have ruled out foul play, but
are advising people not to play on high walls,
particularly those vulnerable members of the population
suffering from eggshell syndrome.

\small\em
Exclusive interview with one of the King's men on page 6.
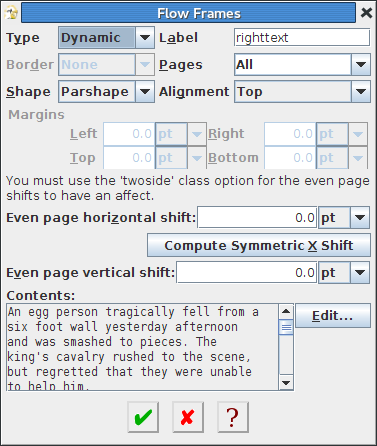
Figure 11.62: Newspaper Example--Assigning Flowframe Data to Right Hand Polygon - I'm going to add an L-shaped segment between the left and right
blocks to clearly delineate them. Switch to the
open line tool, and construct a
path with vertices at: (297.25pt, 159.5pt), (297.25pt,
413.25pt) and (536.5pt, 413.25pt) as shown in Figure 11.63.
(You'll need to switch off the grid lock.)
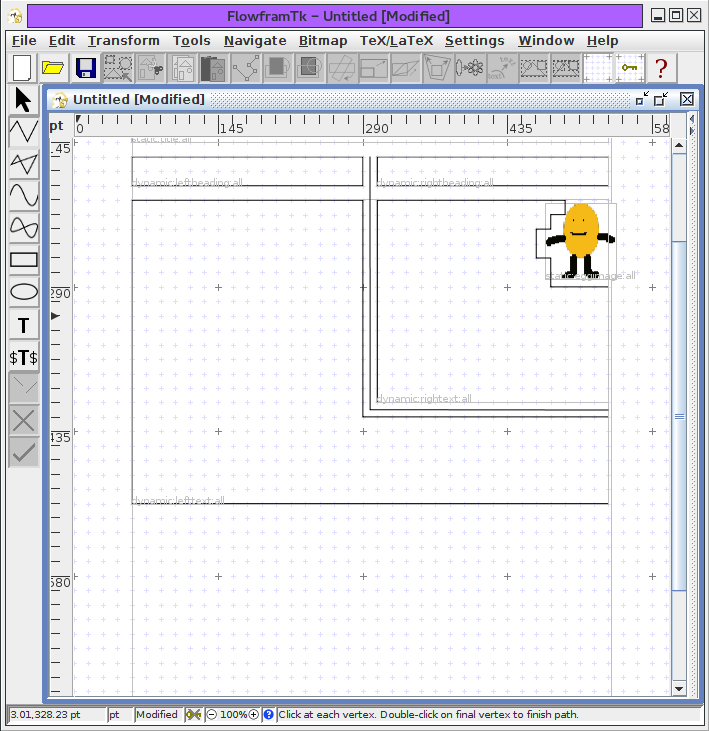
Figure 11.63: Newspaper Example--Added L Shaped Divider - Switch to the select tool, select
this new path and assign the flowframe data shown in
Figure 11.64. Make sure that you have set the
Border field to
As Shown.
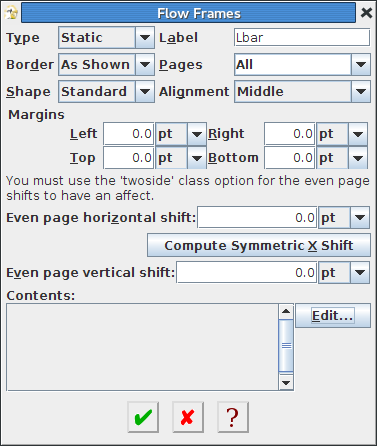
Figure 11.64: Newspaper Example--Assigning Flowframe Data to L Shaped Divider - Next comes a horizontal divider to separate the top two
columns from the bottom columns (which will be created
later). Select the
open line tool, and construct a line
with end points at: (58pt, 514.75pt) and (536.5pt, 514.75pt) as shown
in Figure 11.65.
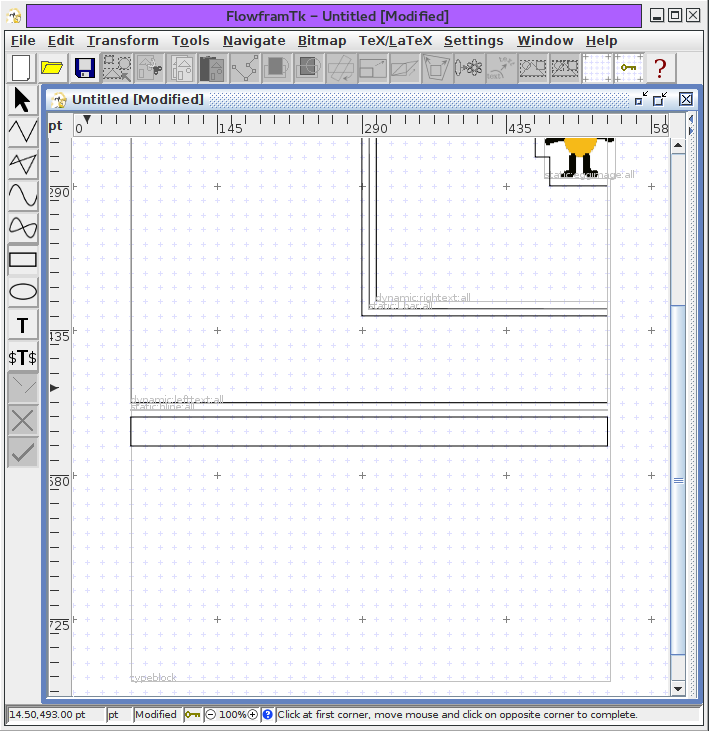
Figure 11.65: Newspaper Example--Added Horizontal Divider - Switch to the select tool, select
this line and assign the flowframe data shown in
Figure 11.66.

Figure 11.66: Newspaper Example--Assigning Flowframe Data to Horizontal Divider - Next comes another header frame. Select the
rectangle tool,
and construct a rectangle with opposing corners at:
(58pt, 522pt) and (536.5pt, 551pt) as shown in Figure 11.67.
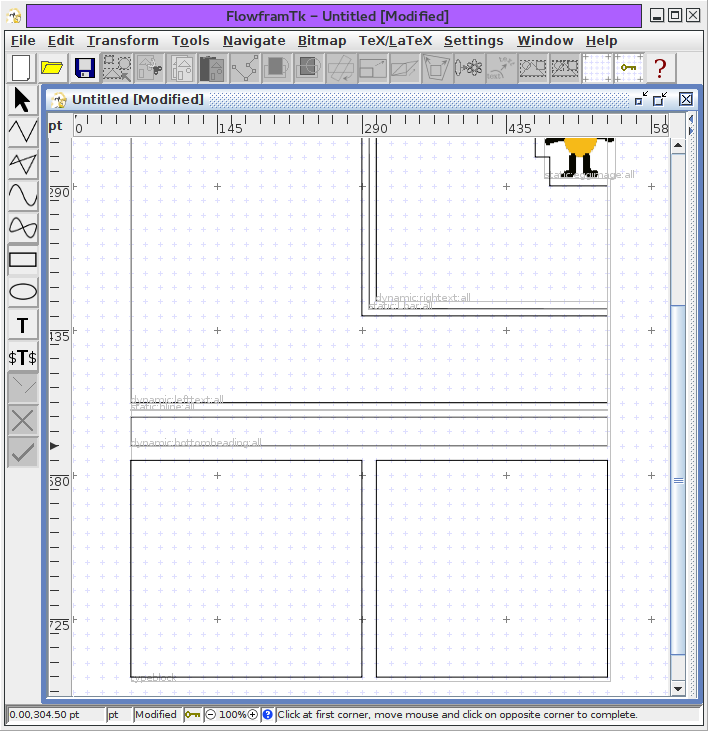
Figure 11.67: Newspaper Example--Added Lower Header - Switch to the select tool, select
this rectangle, and assign the flowframe data as shown in
Figure 11.68. The frame contents is another sectioning
command:
\section{Relief as Missing Sheep Finally Return Home}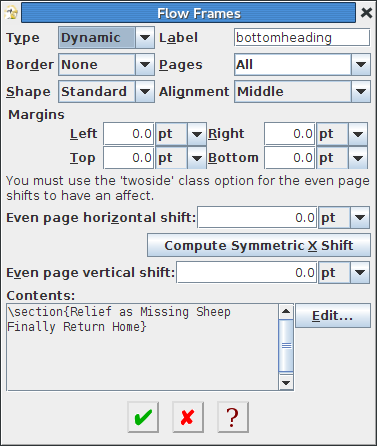
Figure 11.68: Newspaper Example--Assigning Flowframe Data to Lower Header - At the bottom of the page, I want to have two columns,
with the text flowing from the left hand column into the right
hand column. This means that these frames need to be flow frames.
Select the rectangle tool, and
construct two rectangles with opposing corners at:
- (58pt, 565.5pt) and (290pt, 783pt)
- (304.5pt, 565.5pt) and (536.5pt, 783pt)
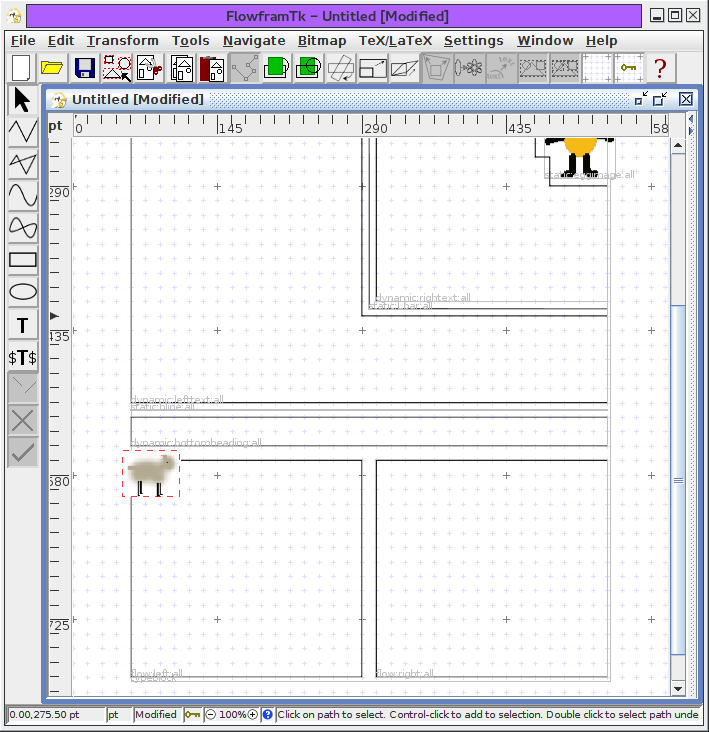
Figure 11.69: Newspaper Example--Added Lower Left and Right Rectangles - Switch to the select tool, select
the left lower rectangle and assign the flowframe data shown in
Figure 11.70. Similarly for the right hand lower rectangle.
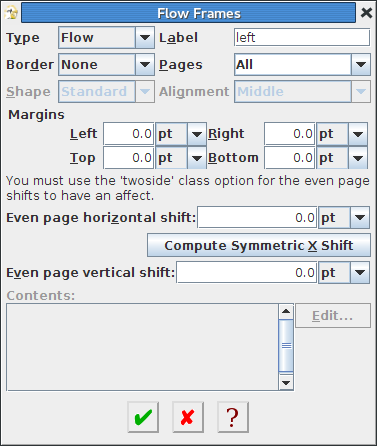
Figure 11.70: Newspaper Example--Assigning Flowframe Data to Lower Left Rectangle - I also want to have an image in the lower left hand frame.
This is going to be slightly more complicated as flow frames
can not be assigned a shape like the static and dynamic frames.
The image I'm going to use is called sheep.png and is
provided with the flowfram package, but it is also
available in the examples subdirectory of FlowframTk's
installation directory. Use Bitmap->Insert Bitmap
to insert this image, and then either drag it with the mouse or use
the Edit->Move By dialog box to move it by (50pt, 556pt)
to the location shown in Figure 11.71.
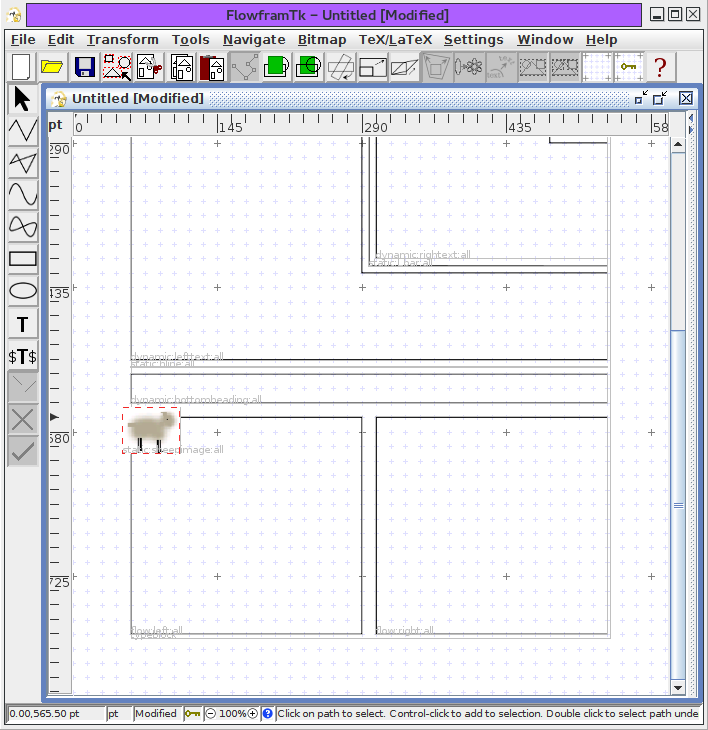
Figure 11.71: Newspaper Example--Added Sheep Bitmap - Assign this bitmap the flowframe data shown in
Figure 11.72.
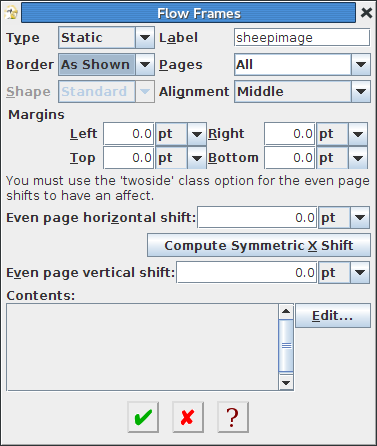
Figure 11.72: Newspaper Example--Assigning Flowframe Data to Sheep Bitmap - As it stands, any text in the left flow frame will overlap
the sheep image, so I'm going to construct a new polygon to go
around the sheep image. This polygon will not form a frame, but
will be used to construct the parameters of the \parshape
command, which can then be input at the start of the flow frame.
To do this, select the closed line tool,
and construct a polygon
with vertices at: (116pt, 565.5pt), (116pt, 580pt), (101.5pt, 580pt),
(101.5pt, 609pt), (58pt, 609pt), (58pt, 783pt), (290pt, 783pt)
and (290pt, 565.5pt) as shown in Figure 11.73.
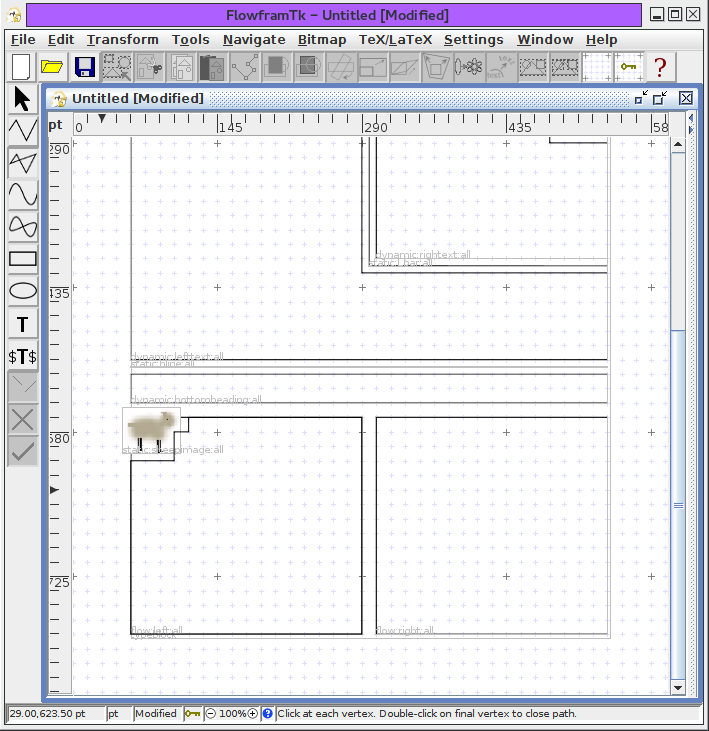
Figure 11.73: Newspaper Example--Added Polygon Defining Text Region - Select this polygon, and select the
TeX/LaTeX->Parshape menu item. This will open the dialog box
shown in Figure 11.74(a). Select the
Use Path option and click
Okay. Save to a file named
sheepcutout.tex (Figure 11.74(b)).
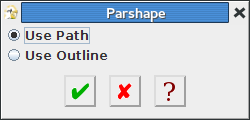
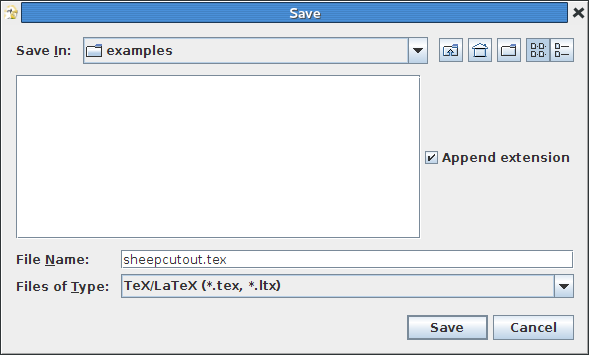
(a) (b) Figure 11.74: Newspaper Example--computing \parshape parameters: (a) select "Use Path" option; (b) export dialog. - Open the preamble pane using preamble editor using
TeX/LaTeX->Preamble Editor or just move the divider across and set the
early-preamble code as
follows:
\usepackage[utf8]{inputenc}
\usepackage[T1]{fontenc}
\usepackage{lmodern}
(see Figure 11.75) and the late preamble to% suppress section numbering \setcounter{secnumdepth}{0} % set the paragraph indentation for static % and dynamic frames \setlength{\sdfparindent}{\parindent}(See Figure 11.76.)
Figure 11.75: Newspaper Example--Setting the Early Preamble Code 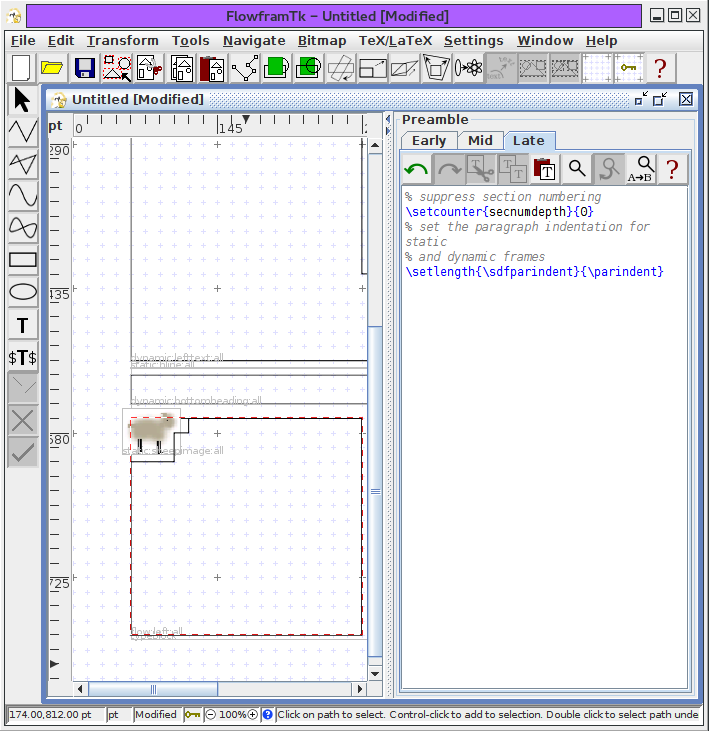
Figure 11.76: Newspaper Example--Setting the Late Preamble Code - Construct a rectangle with opposing corners at: (551.0, 797.5)
and (580.0, 826.5) as shown in Figure 11.77.
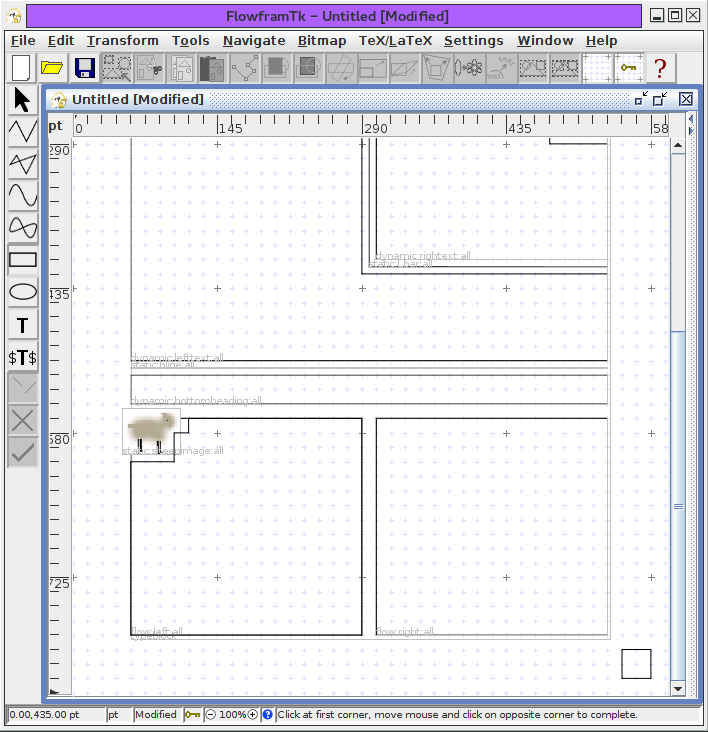
Figure 11.77: Newspaper Example--Constructing the Footer Frame - Following the same procedure as before, select this new rectangle and make it a dynamic frame with
the label "footer" and middle alignment. Then click on the
Compute Symmetric X Shift button to calculate
the horizontal shift for even pages. Set the contents to just
\itshape (see Figure 11.78).
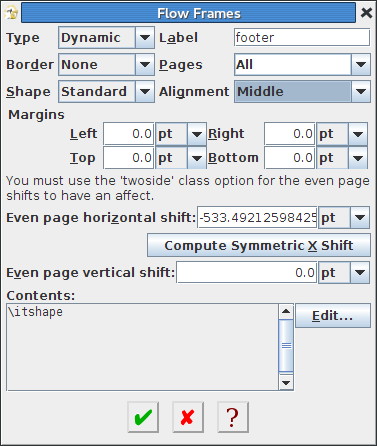
Figure 11.78: Newspaper Example--Assigning the Footer Frame Data - Save the image as newspaper.jdr and then select the
File->Export menu item. Select the
Class (*.cls) filter, and save as
newspaper.cls.
- Use your favourite text editor to create a file called
news.tex that looks like:
\documentclass{newspaper}

\begin{document}
% set the paragraph shape
\input{sheepcutout}
% suppress paragraph indentation
\noindent
There was much celebration yesterday morning when Little Bo
Peep's sheep finally returned home. They had been missing
for more than a week.

``I just didn't know where to find them,'' the shepherdess
stated, ``but I was told to leave them alone and they'd come
home.''

% lots of text omitted
\end{document}
This file is also available in the examples subdirectory of FlowframTk's installation directory. - The included images are PNG files, which means that if you
are not using PDFLaTeX you will have to convert them
to Encapsulated Postscript (EPS) to use LaTeX and
dvips. Run news.tex through LaTeX, e.g.
pdflatex news
The resulting document is shown in Figure 11.79.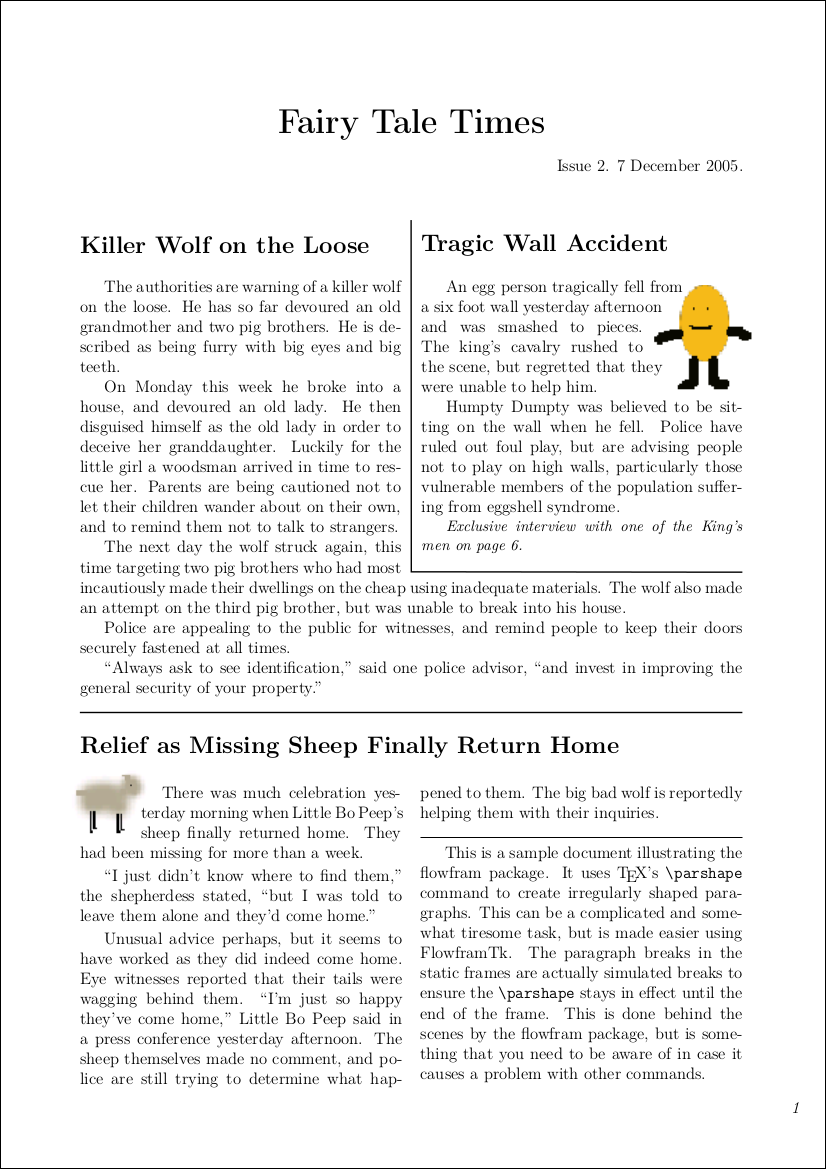
Figure 11.79: Newspaper Example--Final Document
Things to note:
- You may have noticed that I had the page list for all my frames
set to All. Naturally if you
want more pages in your document, you will need to change this.
However on your final page you will need to specify an open ended
range. For example, if you have a 4 page document, then at least
one flow frame defined on page 4 should have a page list like
>3. This is because the flowfram package looks ahead for the next flow frame before it ships out the page. If there are no more flow frames defined, it will automatically create a new flow frame, and you may end up with an unwanted page. - The twoside class option is required to ensure the
footer frame's horizontal shift is implemented on even pages.
Since this example only has one page, there's no noticable
difference.
- If you use FlowframTk to create \parshape'd
paragraphs for your document, you must make sure that the
normal font size setting in FlowframTk's
Document Settings dialog box is the same as that
used by your document, otherwise it
will affect the shape of the paragraph.
Likewise, if your paragraph contains larger or smaller than normal
lines this will also adversely affect the paragraph shape, and you
will need to adjust the shape of the path accordingly.
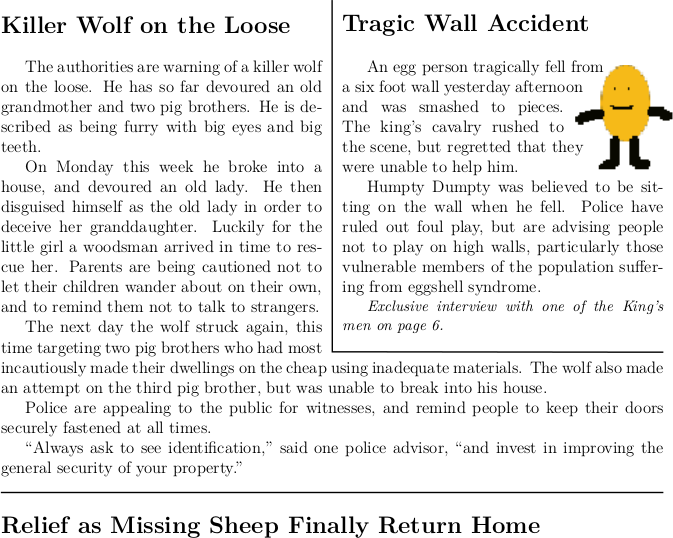
Since I exported to a class rather than a package, the class file correctly sets the normal font size to match the setting used by the image, and I'm only using normal sized text in my paragraphs with no displayed material, so I don't need to worry about it. However, if I had exported to a package, newspaper.sty, which was then included in the document using:
\documentclass[twoside,12pt]{article}
\usepackage{newspaper}

\begin{document}
% set the paragraph shape
\input{sheepcutout}
% suppress paragraph indentation
\noindent
There was much celebration yesterday morning when Little Bo
% etc
Then the paragraph shape will go wrong if the document normal size doesn't match the image's normal size setting (see Figure 11.80).
Footnotes
- ... frame.11.1
- This is of course only an approximate guide, as larger or smaller font sizes may be used in a frame, which will affect the total number of lines in the frame.