A Poster
This example illustrates how to use FlowframTk to help construct frames for use with the flowfram package. The aim is to create a LaTeX2e package based on the flowfram package that defines frames for use with a poster. For this example, I used the A4 landscape paper setting, but it can just as easily be applied to other paper sizes.
- Set the grid to the unit of your choice using the
Settings->Grid->Grid Settings dialog box. For example,
I set the grid settings to major divisions of 1in, with
10 subdivisions. I also
set the storage unit to 1in.
- I recommend that you set the grid lock on (using
Settings->Grid->Lock Grid), to help prevent
having frames with slightly different widths, which will result
in warnings from the flowfram package.
- Set the typeblock, using the
TeX/LaTeX->Flow Frames->Set Typeblock menu item.
I used 1in margins. You should now see the typeblock appear
as a light grey rectangle on the page. (Note that you can not
select or move the typeblock, you can only modify it using the
TeX/LaTeX->Flow Frames->Set Typeblock dialog box.)
See Figure 11.39.
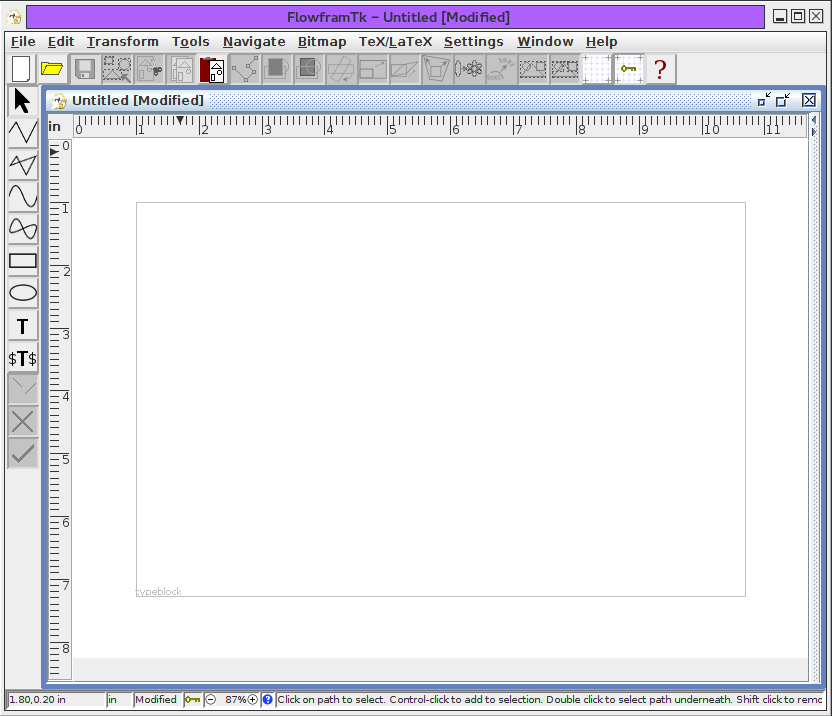
Figure 11.39: Poster Example--The Typeblock - Select the rectangle tool, and create the rectangles
shown in Figure 11.40. The top rectangle is going to
be the title frame, the two tall rectangles on the left
will be flow frames containing the main text for the poster,
and the two short rectangles on the right will be dynamic frames
that will contain a table and a figure. (To ensure that the two tall
rectangles are the same size, you may prefer to use the copy and
paste function.)

Figure 11.40: Poster Example--Adding Rectangles - Switch to the select tool, and add a
bitmap using
Bitmap->Insert Bitmap, to give the
poster a logo, and move it to the location shown
(Figure 11.41).

Figure 11.41: Poster Example--Adding a Bitmap - Garish posters are not recommended, but to illustrate how to
liven up the poster, set the fill colours for the rectangles
using the Edit->Fill Colour dialog box. I also added two
extra smaller rectangles on top of the right hand rectangles, to
give a double border effect (Figure 11.42).

Figure 11.42: Poster Example--Adding Some Colour - Select the top rectangle and the bitmap, and
group them.
Select the bottom right hand rectangles (green) and group them.
Select the middle right hand rectangles (magenta) and group them.
- Select the top group, and select the
TeX/LaTeX->Flow Frames->Set Frame menu item. This will
open up the dialog box shown in Figure 11.43.
Set the type to Static, and call it "title". Set the
margins as desired. (I used 0.1in for all the margins, but you
may want to use different values to ensure that the logo is inside
the margins so that the frame's text doesn't overlap the image.)

Figure 11.43: Poster Example--assigning frame information. (Note that the shape option is not available because the selected object is a group not a path.) - Click on the Edit button to open
the mini TeX editor and type in the following:
\title{A Sample Poster}
\author{Nicola Talbot}
\maketitle
\thispagestyle{empty}
as shown in Figure 11.44. (Since \maketitle sets the page style to plain, this sets it to empty as page numbers aren't appropriate here.)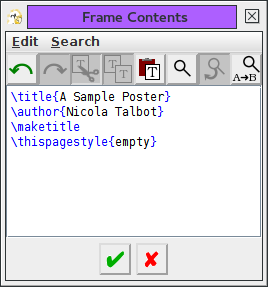
Figure 11.44: Poster Example--Adding Contents to a Static Frame To close the editor either click on the "Okay" button (the one with the green tick) or press Shift-Enter.
- Similarly, make the left hand rectangle a flow frame
with label "left" and the middle rectangle a flow frame with label
"middle". (Flow frames can't be assigned contents, so the
Edit button will now be disabled.)
- Make the two remaining groups dynamic frames
with labels "figure" and "table". For these two, I used larger
margins (0.2in) to compensate for the double border
(Figure 11.45).
Again use the mini TeX editor to set the contents. The "figure" frame's contents are:
\begin{staticfigure}
\centering
Insert figure here!
\caption{A Sample Figure}
\label{fig:sample}
\end{staticfigure}
The "table" frame's contents are:\begin{statictable} \caption{A Sample Table} \label{tab:sample} \centering Insert table here! \par \end{statictable}
Figure 11.45: Poster Example--Frame Information Assigned - Move the slider between the canvas and the preamble
panel, or use the menu item TeX/LaTeX->Preamble Editor to
show the preamble panel. In the early-preamble
tab, add the following:
\RequirePackage[utf8]{inputenc}
\RequirePackage[T1]{fontenc}
\RequirePackage{lmodern}
as shown in Figure 11.46. (You can use \usepackage instead of \RequirePackage. Any instances of \usepackage will automatically be converted to \RequirePackage if the image is exported to a class or package.)
Figure 11.46: Poster Example--Adding Preamble Information - Use the menu item File->Export to create
a new LaTeX package or class that defines these frames. Remember to
select the Package (*.sty) file filter.
I called my file poster.sty (Figure 11.47) which
will create a package rather than a class.

Figure 11.47: Poster Example--Export Frame Information to a LaTeX Package - Create a LaTeX document that uses this package or class.
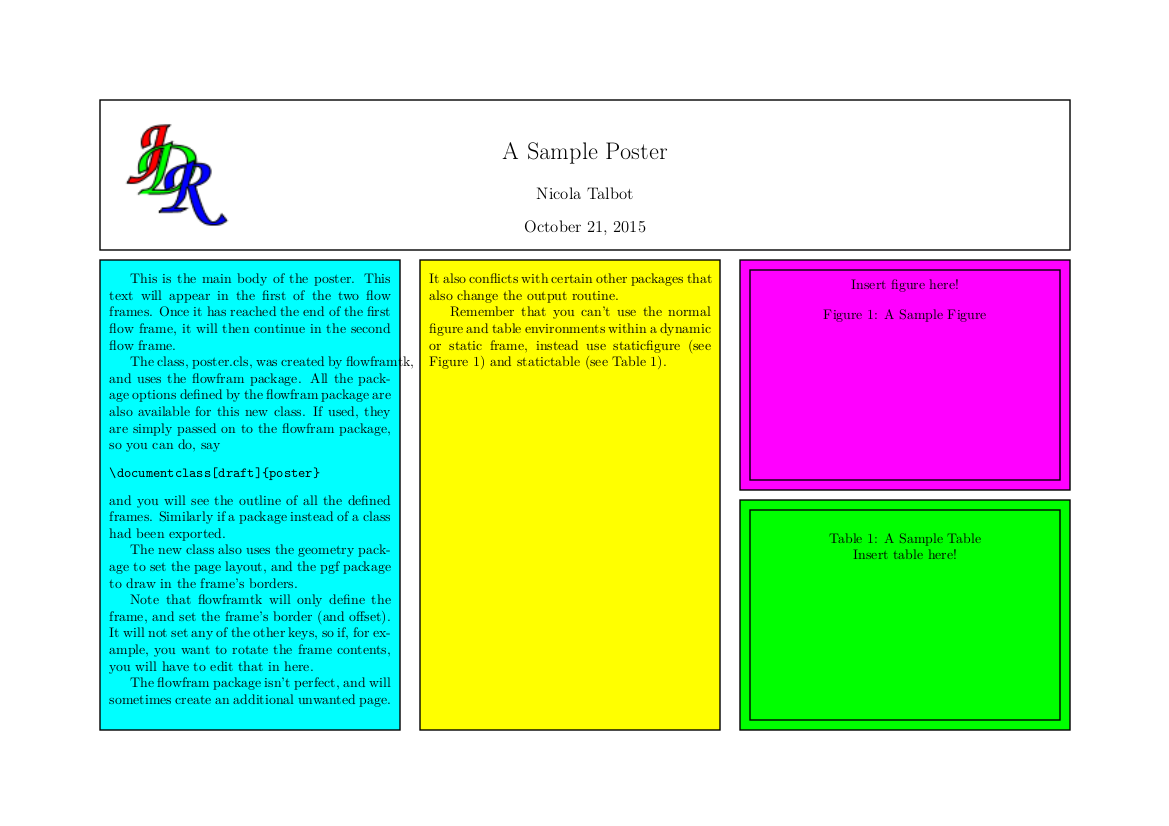
First, let's suppose I've exported to a package. Since I used A4 landscape paper, it's simplest use the article class file. If you use a larger size (e.g. A0), it would be more appropriate to use the a0poster class file.
I created the following file called poster.tex:
\documentclass{article}

% use new package created in this example:
\usepackage{poster}

\begin{document}

This is the main body of the poster. This text will
appear in the first of the two flow frames. Once it
has reached the end of the first flow frame, it will
then continue in the second flow frame.

% Lots of text omitted

\end{document}
Now suppose I've exported to a class by using the Class (*.cls) filter in the export dialog. Then the start of my poster.tex file just uses this class:
% use new class created with this example:
\documentclass{poster}

\begin{document}
This is the main body of the poster. This text will
appear in the first of the two flow frames. Once it
has reached the end of the first flow frame, it will
then continue in the second flow frame.

% Lots of text omitted

\end{document}
This is actually more convenient than creating a package. - To make the poster a PDF document, do:
pdflatex poster.tex
(Note that the pgf package is used to create the borders, so you will need to use a driver that understands the \special commands used by the pgf package, such as PDFLaTeX or LaTeX and dvips.) The final document is illustrated in Figure 11.48.
 |