TeX Settings Dialog
The menu item Settings->Configure TeX/LaTeX Settings will open up a dialog box in which you can adjust the TeX/LaTeX settings. (Image Settings Dialog covers image settings and User Interface Settings Dialog covers user interface settings.)
Setting the Document Class and Normal Font Size
Most of FlowframTk's TeX/LaTeX related functions (including the export function) require a value corresponding to \normalsize (the LaTeX command that sets the normal font size). A text area needs to know the normal font size to determine the appropriate font size declaration (see Font Size). In addition, both the parshape and shapepar functions use the value of \baselineskip for the normal font size in order to determine the location of the scan lines used to compute the required parameters. This also means that any static or dynamic frames that use a non-standard paragraph shape also require this information.
 |
The normal font size can be set using the Document Settings tab (Figure 3.9). Select the required value from the drop-down list and select Okay to set it. Note that you must remember to use this value in your document. For example, if you set the normal size as 20, your document will need to use one of the extsizes class files, e.g. extarticle, and specify 20pt as one of the optional arguments:
\documentclass[20pt]{extarticle}
Note that the largest normal size listed (25pt3.2) is for use with the a0poster class file. Remember that for very large or very small fonts, you will need to use scalable fonts in your document to prevent font size substitutions. Available values, along with the corresponding value of \baselineskip and the file in which they are defined, are listed in Table 3.2.
If the checkbox labelled Update all LaTeX font size declarations in current image is selected, changing the normal size setting in this dialog will update the LaTeX font size settings for all the text areas in the current image.
If you want to export your image to a complete LaTeX document (see Export to Single-Paged Document) the document class will default to:
- article, if the normal size is set to 10, 11 or 12;
- a0poster, if the normal size is set to 25;
- extarticle, otherwise.
The document class is also used as the base class with the export to document class function (see Export to a Class or Package) and is used for all export functions that use the export to encapsulated LaTeX document function as an intermediate step (Export to Single-Paged Document).
The Use relative font size declarations checkbox governs the suggested LaTeX font size command when you change the font size setting for text areas. If this checkbox is selected, FlowframTk will attempt to select a font size declaration, such as \large, according to the current normalsize setting. Otherwise, \setfontsize will be used. If the font size is significantly larger than the largest available declaration, \setfontsize will be used regardless of this setting.
The Add \pdfinfo to exported LaTeX documents checkbox governs whether or not to add \pdfinfo to exported LaTeX documents. If the image has a description, this will be added to the /Title attribute. The only other attribute that is set is the /CreationDate attribute. This setting is not used for the export to PostScript or SVG functions as they use latex rather than pdflatex.
When an image is exported to an encapsulated LaTeX document or complete LaTeX document, by default the image bounding box is calculated as the minimal sized rectangle that encompasses all objects on the canvas. If the image contains an text areas, this may result in text being clipped to the left or right of the image due to the font differences. In this case, or if you require a different bounding box for some other reason, then switch on the Use typeblock as bounding box for pgfpicture checkbox and if the image has a typeblock set (see Defining the Typeblock) the typeblock will be used as the image bounding box. If the image doesn't have a typeblock set, then the default bounding box will be used. See also Figure 5.3 in Export to Single-Paged Document.
Flowframe Settings
The Flowframe Settings tab (Figure 3.10) allows you to adjust the flowfram related settings.
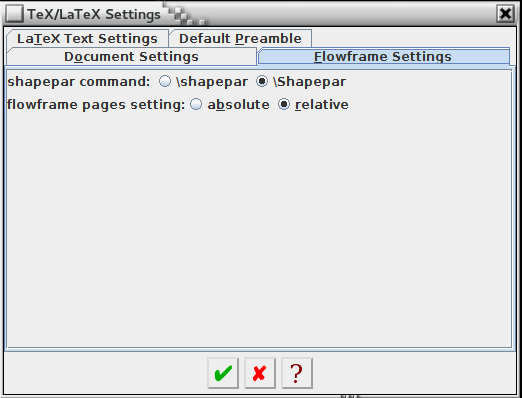 |
The flowfram package now allows you to use absolute pages numbers in the page list rather than using the value of the page counter. For example, if your document pages are numbered a, b, i, ii, iii, 1, 2, 3, then with the absolute setting page number 3 refers to the page labelled i whereas with the relative setting page number 3 refers to both the page labelled iii and the page labelled 3. (See the flowfram documentation for further details.) If you want to use the absolute setting, select the button labelled absolute otherwise select the button labelled relative.
The shapepar package now has a command called \Shapepar that behaves slightly differently to \shapepar. Since \Shapepar works better than \shapepar when used with the flowframe package, FlowframTk defaults to using \Shapepar for the TeX/LaTeX->Shapepar function or when a static or dynamic frame has the shape set to Shapepar. However, if you prefer the original \shapepar command, selected the appropriate shapepar command radio button. If you want to use \Shapepar, you need to ensure you have up-to-date versions of the flowfram and shapepar packages. This setting applies both to frames with the Shapepar shape setting and to the TeX/LaTeX->Shapepar function.
Text Settings
The LaTeX Text Settings tab (Figure 3.11) allows you to adjust the text-related settings.
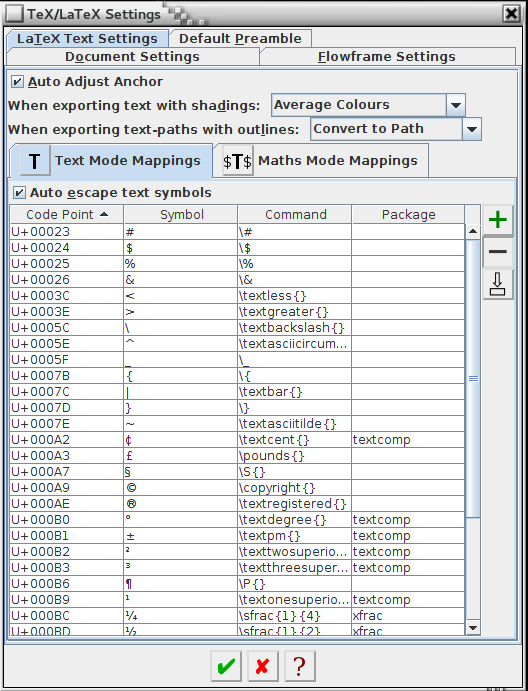 |
- If the Auto Adjust Anchor checkbox is selected, whenever
you justify a group, any
text areas in that group will have their anchors automatically
adjusted.
- FlowframTk can't implement paint shadings for text when
exporting to pgf. (This includes the
export functions that use latex or pdflatex, such as
the export to PDF function.) You can choose how FlowframTk should export
shaded text using the When exporting text with shadings dropdown
box. Available options:
- Average Colours
- The text will be given the colour obtained by averaging the shading's start and end colour.
- Use Start Colour
- Just the shading's start colour will be used.
- Use End Colour
- Just the shading's end colour will be used.
- Convert to Path
- The text will be exported as a path rather than text. This means that the LaTeX alternative text attribute will be ignored. This is equivalent to applying the convert to path, ungroup and merge path functions (without actually changing your image).
- FlowframTk can't implement the text
outline option for
text-paths when exporting to pgf. (Again, this
includes the export functions that use latex or pdflatex.)
You can choose how FlowframTk should export text-path outlines using the When exporting text-paths with outlines
dropdown box. Available options:
- Convert to Path
- The text-path will be exported as a path rather than a
text-path. This means that the LaTeX alternative text attribute will be ignored. This is equivalent to
applying the convert to path, ungroup and merge path functions,
without actually changing your image.
(This option will always override the shading options described
above, if the text-path has a shading.)
- Ignore Outline
- The outline attribute will be ignored.
![]()
![]() FlowframTk has two tools for creating text areas: the
regular text-mode tool (Tools->Text) and the
maths-mode tool (Tools->Maths). Each text area has an
associated LaTeX alternative text which, if set, is used
during the pgf export operations in place of the
text displayed on the canvas. (This includes the export
functions that use latex or pdflatex, such as
the export to PDF function.) The maths-mode tool automatically
inserts the maths-shift dollar symbols $ at the start and end of the
alternative text. In addition, Unicode symbols present in
the text when a new text area is constructed can be mapped to
a LaTeX command.
FlowframTk has two tools for creating text areas: the
regular text-mode tool (Tools->Text) and the
maths-mode tool (Tools->Maths). Each text area has an
associated LaTeX alternative text which, if set, is used
during the pgf export operations in place of the
text displayed on the canvas. (This includes the export
functions that use latex or pdflatex, such as
the export to PDF function.) The maths-mode tool automatically
inserts the maths-shift dollar symbols $ at the start and end of the
alternative text. In addition, Unicode symbols present in
the text when a new text area is constructed can be mapped to
a LaTeX command.
The mappings applied depend on which tool has been selected. With the regular text-mode tool, all the ten TeX special characters are mapped to commands. In addition, there are some other characters that are also mapped by default. These are listed in the table shown in the Text Mode Mappings tab (see Figure 3.11). If you don't want any text mappings applied, deselect the Auto escape text symbols checkbox.
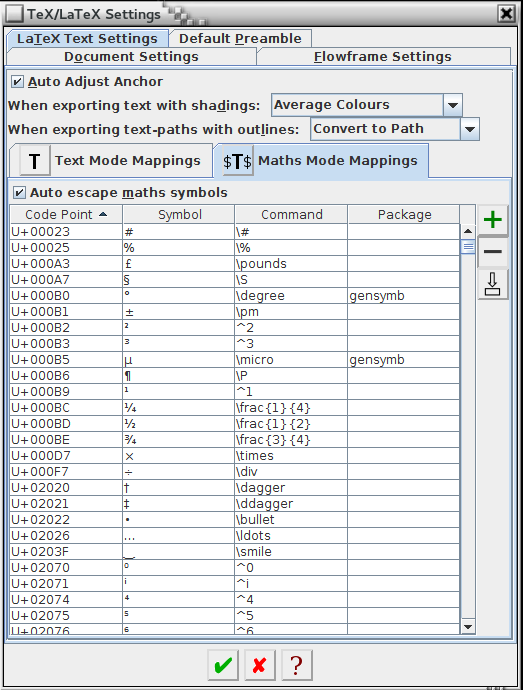
With the maths-mode tool, the hash # and percent % characters are the only two of the ten TeX special characters that are mapped by default. However there are other mappings of maths-related Unicode characters and these are listed in the table shown in the Maths Mode Mappings tab (see Figure 3.12). If you don't want maths mappings applied, deselect the Auto escape maths symbols checkbox.
 |
The mapping tables can be sorted by clicking on
their column headers. You can add, delete or modify any of these
text- or maths-mode mappings. Any mapping that ends with a control
word (a backslash followed by one or more letters) should
usually be followed by a space or {} to prevent it from
running into any subsequent letter when the mapping is applied. For
text-mode mappings, {} is better in case the command is
followed by an intended space, although this may depend on the
command definition. For maths-mode mappings it's better
to follow the control word with a space.
![]() You can delete a mapping or mappings by selecting the appropriate row of the
mapping table (use shift-click or ctrl-click to add to the
current selection) and clicking on the red minus button
to the side of the table. To restore all the original mappings,
quit FlowframTk and delete or rename the files
mathmappings.prop and textmappings.prop in the
configuration directory.
You can delete a mapping or mappings by selecting the appropriate row of the
mapping table (use shift-click or ctrl-click to add to the
current selection) and clicking on the red minus button
to the side of the table. To restore all the original mappings,
quit FlowframTk and delete or rename the files
mathmappings.prop and textmappings.prop in the
configuration directory.
To edit an existing mapping, double-click on the second and third columns of the mapping table. The first two columns can't be edited.
![]() To add a new mapping, click on the green plus button to
the side of the relevant table. This will open the add new mapping
dialog. Enter the character you want mapped in the
Symbol box or type the hexadecimal
value in the Code Point box
and then enter the replacement
command in the Command box. If the
command is defined in a package, enter the package name (without the
.sty extension) in the Package
box. If the mapping requires multiple commands from different
packages, you can specify a comma-separated list of packages in the
Package box. If the replacement command
is available in the LaTeX kernel, you can leave this box blank.
(These packages will be automatically added to the
image's early-preamble code, whenever the mapping is applied.)
To add a new mapping, click on the green plus button to
the side of the relevant table. This will open the add new mapping
dialog. Enter the character you want mapped in the
Symbol box or type the hexadecimal
value in the Code Point box
and then enter the replacement
command in the Command box. If the
command is defined in a package, enter the package name (without the
.sty extension) in the Package
box. If the mapping requires multiple commands from different
packages, you can specify a comma-separated list of packages in the
Package box. If the replacement command
is available in the LaTeX kernel, you can leave this box blank.
(These packages will be automatically added to the
image's early-preamble code, whenever the mapping is applied.)
The package name may be preceded by optional arguments in square brackets such as [weather]ifsym (note that the package name isn't enclosed in braces). Set the package name to "none" or leave it empty if you don't want it automatically added to the early-preamble code when the mappings are applied.
For example, in Figure 3.13 the new mapping dialog is being used to define a new text mapping from the Unicode dagger † symbol (U+2020) to the \textdagger command. Since this command is defined in the LaTeX kernel, the package field can be left empty. The Unicode symbol can be specified either by typing the hexadecimal code into the Code Point field or by typing the actual symbol into the Symbol field. If there is already a mapping for this Unicode symbol, the old mapping will be overwritten.
 |
![]() You can also import mappings from a tab-separated file (.tsv)
where the first column is the hexadecimal code, the second column is
the command (or commands) and the third column is the package name
or comma-separated list of packages. Any additional columns are
ignored, as are blank lines or lines starting with # (hash). The file
shouldn't contain any delimiters nor may any of
the cells contain a newline or tab character. For example,
the file may look like:
You can also import mappings from a tab-separated file (.tsv)
where the first column is the hexadecimal code, the second column is
the command (or commands) and the third column is the package name
or comma-separated list of packages. Any additional columns are
ignored, as are blank lines or lines starting with # (hash). The file
shouldn't contain any delimiters nor may any of
the cells contain a newline or tab character. For example,
the file may look like:
00260E  \Telephone      [misc]ifsym
0026A1  \Lightning      [weather]ifsym
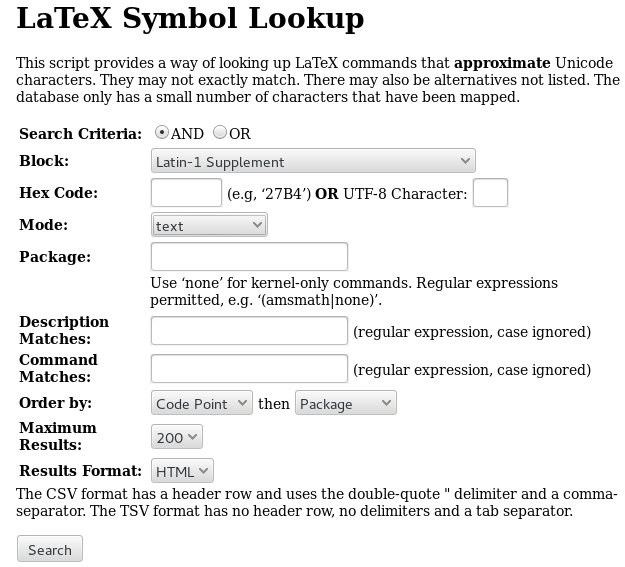
You can find extra mappings using the Symbol Lookup page at
http://www.dickimaw-books.com/latex/symbol-lookup.php which
has a web form you can use to look up mappings in the database. If
the mapping ends with a control word the import function will
automatically append a space for maths-mode or
{} for text-mode, unless the Unicode character type is one
of: combining spacing mark, connector punctuation, modifier symbol
or modifier letter, in which case just a space is appended.
(This adjustment isn't done for the edit mapping or
add a single-mapping functions described above. You need to do this
yourself, as I did in Figure 3.13.) If this
adjustment isn't appropriate, you can edit the mapping to remove it.
For example, in Figure 3.14, I've selected the "Latin-1 Supplement" block with the mode set to "text". If I then click on the "Search" button at the bottom of the form, this will list all the mappings listed in the database that match. To import these values into FlowframTk, you first need to download them in the correct format. Set the "Results Format" drop-down list to TSV (not CSV) and click on the "Search" button. Depending on your browser, this may automatically save the file symbol-lookup.tsv in your downloads directory/folder or it may try to open the file. Be careful if it tries to open the file in a spreadsheet application as this may change the format to one that's not compatible with FlowframTk.
 |
If you try this search on the Symbol Lookup page and open the file in your favourite text editor, you may notice that some codepoints are listed multiple times. For example:
0000A3  \textsterling   none    text    0
0000A3  \pounds         none    both    0
If you simply import the file into FlowframTk, new mappings will override the earlier mappings, so in this case the mapping for U+A3 will be set to \pounds rather than \textsterling so delete any of the mappings you don't want before you import the file.
This example also produces mappings that require the fontenc package. For example:
0000AB \guillemotleft fontenc text 0This indicates commands that are part of the LaTeX kernel but don't work with the default OT1 font encoding. In my case, I've set my default preamble to include fontenc with the T1 encoding, so I don't want that package automatically added to my early-preamble code. To fix this, I just need to use my text-editor's search-and-replace function to replace all instances of "fontenc" with "none" before I import this file. If you don't have this package in the default preamble, you'll need to add the appropriate option. For example, change the line to:
0000AB \guillemotleft [T1]fontenc text 0(Again, you can use your text-editor's search-and-replace function.) Similarly, if you want to import any of the symbol maps that include commands from the mathdesign package, you'll need to add the option to set the required font. For example
002231 \intclockwise [utopia]mathdesign math 1
Once all these modifications have been made, the file can then be imported by clicking on the import button in the appropriate mapping pane. In this case, I have fetched mappings that are valid in text-mode, so I need to select the Text Mode Mappings tab and then click on the import button to the right of the mapping table. This will open a file chooser which I can use to select the TSV file.
![]() Note that mappings take up resources and the more mappings you have,
the longer it will take to startup FlowframTk, so it's best to only
add the mappings that you're likely to need. The symbol lookup form
on the Dickimaw Books website has a maximum limit of 500 for the search
results. (A smaller limit can be set if required. The default value
is 200.)
Note that mappings take up resources and the more mappings you have,
the longer it will take to startup FlowframTk, so it's best to only
add the mappings that you're likely to need. The symbol lookup form
on the Dickimaw Books website has a maximum limit of 500 for the search
results. (A smaller limit can be set if required. The default value
is 200.)
Default Preamble
The Default Preamble tab (Figure 3.15) allows you to specify code that should always be added to the preamble when exporting images to complete LaTeX documents or formats that use the encapsulated LaTeX document function as an intermediate step (see Export to Single-Paged Document). This code isn't used for the export to class (.cls) or package (.sty) functions.
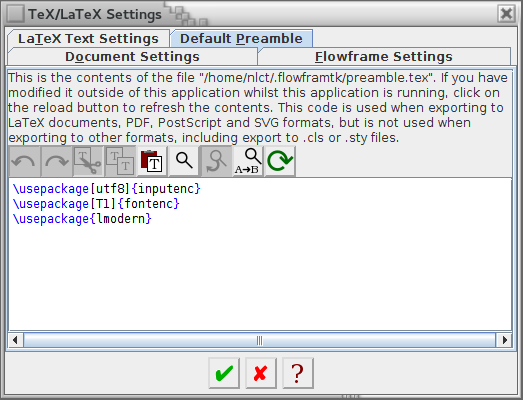 |
The default preamble code is stored in a file called preamble.tex in FlowframTk's configuration directory. If you edit this file outside of FlowframTk, you'll need to use the reload button to refresh this panel. The other buttons are the same as for the TeX editor described in TeX Editor Settings. You can also access these button actions through the context menu, which can be opened using a menu-click on the editor pane.