Computing the Parameters for parshape
TeX's \parshape command can be used to change a standard rectangular shaped paragraph into a non-rectangular shape. The \parshape command has the following format:
\parshape=<n>
<i1>
<i1>
...<in>
<ln>
where <i1> is the indent for
the first line and <l1> is
the length of the first line, etc. This command should be placed at
the start of the paragraph, and is only applied to that paragraph.
If there are more than <n> lines in the
paragraph, the specification for the <n>th
line will be used until the end of the paragraph. If there are less
than <n> lines in the paragraph, the shape
will be truncated. See The TeXbook [1] for further
details.
Since each line in the paragraph is constructed from only indent and line width information, only certain types of shapes can be specified by a \parshape. If you imagine horizontal scan lines passing through the shape, each scan line should not be able to intersect the boundary of the shape more than twice.
Before you use FlowframTk to determine the parameters for \parshape, you must first ensure that you have set the normal font size to the value used in your document. See, for example, Figure 11.80 (in Step-by-Step Example: A Newspaper) which illustrates what happens when you fail to do this.
To determine the parameters for a \parshape, create your shape as a single path. Select this path, and use the menu item TeX/LaTeX->Parshape. This will open up a dialog box in which you can specify whether you want to use the outline defined by the actual path, or whether you want to use the outline defined by the line style.
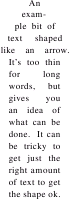
For example, Figure 10.3(a) shows a path which consists of a single line segment (shown in Figure 10.3(b)), but with a line thickness of 52bp, butt cap and an equilateral triangle start marker of size 80bp. If you select the Use Path option, FlowframTk will attempt to construct the parameters from the actual path (ignoring the line style) which it will not be able to do, as the path has no area. If you select the Use Outline option, FlowframTk will construct the parameters from the outline as seen on the screen. These parameters can be saved to a file, and used in a TeX or LaTeX document to create a shaped paragraph (Figure 10.3(c)).

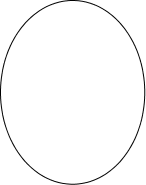
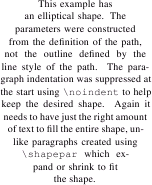
Another example is shown in Figure 10.4. In this example, the path was constructed using the ellipse tool. If you select the Use Path option, FlowframTk will compute the parameters used to create the paragraph shown in Figure 10.4(b). In this example, you will not be able to use the Use Outline option as this will attempt to create an annulus defined by the path's border, which can't be done by \parshape (but can be done by \shapepar, although it is not recommended for such a narrow line width).
|
Whilst the parameters are being computed, the horizontal scan lines used by FlowframTk will appear on screen, and if successful, a dialog box will appear for you to save the \parshape command to a file. You can then input this file at the start of the appropriate paragraph in your TeX or LaTeX document. For example, if you save the \parshape command to a file called, say, myparshape.tex, then if you are using plain TeX you would need to do:
\input myparshape
This is the start of the paragraph...
or if you are using LaTeX you would need to do:
\input{myparshape}%
This is the start of the paragraph...
You may want to suppress the paragraph indentation using
\noindent:
\input{myparshape}%
\noindent This is the start of the paragraph...
The distance between the scanlines is given by the value of \baselineskip for the normal font size. For example, if the normal font size is 10pt, \baselineskip will be 12pt, and this will be the distance used between the scanlines. It is therefore important that you set the value for the normal font size before using this function.
See also: