5.5 Cross-Referencing
We have already seen that LaTeX takes care of all the numbering for the chapters etc, but what happens if you want to refer to a chapter or section? There's no point leaving LaTeX to automatically generate the section numbers if you have to keep track of them all, and change all your cross-references every time you add a new section. Fortunately LaTeX provides a way to generate the correct number. All you have to do is label the part of the document you want to reference, and then refer to this label when you want to cross-reference it[Referring to labels in other documents]. LaTeX will then determine the correct number that needs to be inserted at that point.
The first part, labelling the place you want to reference, is done using the command:
The argument <string> should be a unique textual label. This label can be anything you like as long as it is unique, but it's a good idea to make it something obvious so that, firstly, you can remember the label when you want to use it, and secondly, when you read through your code at some later date, it's immediately apparent to you to which part of the document you are referring. People tend to have their own conventions for labelling. I usually start the label with two or three letters that signify what type of thing I'm labelling. For example, if I'm labelling a chapter I'll start with ch, if I'm labelling a section I'll start with sec.
Examples:
- Labelling a chapter:
- Labelling a section:
Note that the \label command doesn't produce any text, it
simply assigns a label. You can now refer to that object
using the command:
which will produce the relevant number.
Example:
It is a typographical convention that you should never start a new line with a number. For example, if you have the text “Chapter 1” the “1” must be on the same line as the “Chapter”. We can do this by using an unbreakable space, which will put a space but won't allow LaTeX to break the line at that point. This is done using the tilde (~) special character, so the example above should actually be:
There is a similar command to reference the page number:
Example:
The label ch:def obviously needs to be defined somewhere:
In fact, I have done this in my source code for the definitions section of this document, so the above example would look like:
[Referring to things by their name]It's not just chapters and sections that you can reference, most of the numbers that LaTeX automatically generates can be cross-referenced.
Example:
The source code for footnote 5.1 in §5.4. Creating a Table of Contents is:
and can be referenced using:
The varioref package provides a more convenient way of doing this using the command:
This is like \ref but also adds information about the location,
such as “on page <n>” or “on the following page”, if the
corresponding \label occurs on a different page, so the above
example can be changed to:
which produces
Caveat:
You can run into trouble if the \vref command occurs on a
page break. When it tries to insert the location information, such
as “on the next page”, the information is no longer correct. This
can cause an “Infinite loop” error. When this happens, either
edit your paragraph so the reference no longer falls on the page
break or use \ref instead of \vref for that instance.
Another Example:
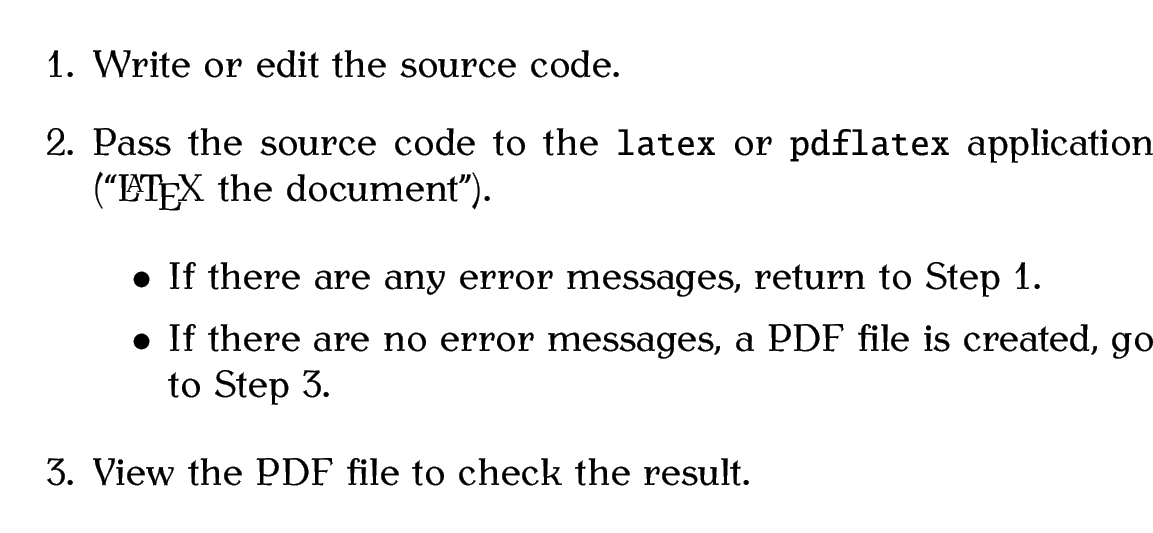
The enumerate environment automatically numbers the items within an ordered list, so it's possible to label list items. Recall the numbered list of instructions at the start of §3. From Source Code to Typeset Output. Here's the code:
\begin{enumerate}
\item\label{itm:edit} Write or edit the source code.
\item Pass the source code to the \texttt{latex} or \texttt{pdflatex}
application (``
\LaTeX\␣the document'').
\begin{itemize}
\item If there are any error messages,
return to Step~
\ref{itm:edit}.
\item If there are no error messages, a PDF file
is created, go to Step~
\ref{itm:view}.
\end{itemize}
\item\label{itm:view} View the PDF file to check the result.
\end{enumerate}
Output:
The \ref and \pageref commands may come before or
after the corresponding \label command. As with the table
of contents, LaTeX first writes out all the cross-referencing
information to another file (the auxiliary (.aux) file, see §2.4. Auxiliary Files) and then reads it in the
next time, so you will need to LaTeX your document twice to get
everything up-to-date.
If the references aren't up-to-date, you will see the following message at the end of the LaTeX run:
LaTeX Warning: Label(s) may have changed.
Rerun to get cross-references right.
The following warning
LaTeX Warning: There were undefined references.means that LaTeX found a reference to a label that does not appear in the auxiliary file. This could mean that it's a new label, and the warning will go away the next time you LaTeX your document, or it could mean that either you've forgotten to define your label with the
\label command,
or you've simply misspelt the label. The undefined references
will show up as two question marks ?? in the output file.
[“Rerun” messages won't go away]Very occasionally, if you have cross-references and a table of contents, you might have to LaTeX your document three times to get everything up to date. Just check to see if the Label(s) may have changed warning appears.
If you find it inconvenient having to remember to click the typeset button twice, you can use latexmk. This will run LaTeX the required number of times to ensure the document is up-to-date. To do this in TeXWorks, change the drop-down menu to “LaTeXmk”, as illustrated in Figure 5.1. Note that latexmk is a Perl script, so you need to make sure you have perl installed (see §2.20. Perl).

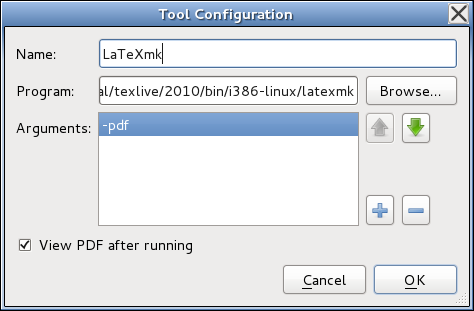
If latexmk isn't listed in the drop-down menu, you can add it via Edit→Preferences. This opens the dialog box shown in Figure 5.2. You can add a new tool as follows:
- To the right of the box
labelled “Processing Tools” there is a button marked with a plus
(+) sign. Click on it to open the tool configuration dialog, shown
in Figure 5.3.
- Fill in the name “LaTeXmk” in the box labelled “Name” and either type
in the location of latexmk in the box labelled “Program”
or use the “Browse” button to locate it on your filing system.
(See Figure 5.4.) This will vary depending
on your operating system and TeX-distribution, but it will
probably be in a subdirectory (folder) called bin somewhere
in the TeX-distribution tree.
- There are lots of options that can be passed to
latexmk, but if you want to produce PDF output you need to
add -pdf as an argument. This is done by clicking on the
button marked with a plus to the right of the “Arguments” box and
type -pdf, as shown in Figure 5.5.
- Another argument needs to be added that specifies the
basename of the LaTeX file. This is done by again clicking on the
plus button and typing
$basename, as shown in Figure 5.6 . - Click on “OK” to close the Tool Configuration dialog.
- If you want to set latexmk to be your default
processing tool, you can select it from the drop-down list labelled
“Default”.
- Click “OK” when you're done.


Exercise 12: Cross-Referencing
Try modifying your code so that it has cross-references. Again, changes made from the previous exercise are illustrated like this:
\documentclass[12pt]{scrreprt}
\usepackage{datetime}
\title{A Simple Document}\author{Me}
\begin{document}
\maketitle
\tableofcontents
\begin{abstract}
A brief document to illustrate how to use\LaTeX.\end{abstract}
\chapter{Introduction}\label{ch:intro}
\section{The First Section}
This is a simple\LaTeX\␣document. Here is the first paragraph.
The next chapter is Chapter~\ref{ch:another}
and is on page~\pageref{ch:another}.
The next section is Section~\ref{sec:next}.
\section{The Next Section}\label{sec:next}
Here is the second paragraph\footnote{with a footnote}.
As you can see it's a rather short paragraph, but not
as short as the previous one. This document was
created on:\today\␣at\currenttime.
\chapter{Another Chapter}\label{ch:another}
Here's another very interesting chapter.
We're going to put a picture here later.
See Chapter~\ref{ch:intro} for an
introduction.
\chapter*{Acknowledgements}
I would like to acknowledge all those
very helpful people who have assisted
me in my work.
\appendix\chapter{Tables}
We will turn this tabular environment into a table later.
\begin{tabular}{lrr}
&\multicolumn{2}{c}{\bfseriesExpenditure}\\
&\multicolumn{1}{c}{Year1} &\multicolumn{1}{c}{Year2}\\\bfseriesTravel & 100,000 & 110,000\\\bfseriesEquipment & 50,000 & 60,000\end{tabular}
\end{document}
(You can download a copy of this file.)
This book is also available as A4 PDF or 12.8cm x 9.6cm PDF or paperback (ISBN 978-1-909440-00-5).